Saturday, May 27, 2017

Samsung Galaxy S Duos GT S7562 GT S7562L Flash Files Direct Download Links


Download Here all you need of Samsung Flash Files, Softwares, And Firmwares for your Samsung Galaxy S Duos GT-S7562 | GT-S7562L, Check here for the Latest Samsung Updates Available for this Samsung Model.

What Makes this Site Special ?

It is The Fastest and Easiest Way to Free Download all Samsung Flash files, Firmwares, And Software Updates Directly and for Free, No need to wait, And without any registration at all, Firmware downloads is very easy, Just look for the Firmware or Flash file you need for any Samsung Android smartphone model, or any Samsung mobile phone you want to update its Software version, Then download directly, Directly for free too.

Below we listed all the latest version of flash files, Firmwares package, Operating system for your Samsung Galaxy S Duos GT-S7562 | GT-S7562L, So select the flash file you want and download it free without waiting, you can find many languages package for this smartphone.

The Latest Flash Files for Samsung Galaxy S Duos GT-S7562 | GT-S7562L:

&nbs p; S7562XXALJ4_ATOALH1_Austria_Android_4.0.4.zip - 508.6 MB
  S7562XXALJ4_OXFALJ1_BGL_Bulgaria_Android_4.0.4.zip - 503.7 MB
  S7562XXALJ4_OXXALJ3_EUR_Greece_Android_4.0.4.zip - 503.8 MB
  S7562XXALJ4_OXXALJ3_XEH_Hungary_Android_4.0.4.zip - 503.8 MB
  S7562XXALJ4_VVTALJ2_Bulgaria_VVT_Android_4.0.4.zip - 505.5 MB
  S7562XXALJ6_OPTALJ3_Portugal_Optimus_Android_4.0.4.zip - 513.5 MB
  S7562XXAMA2_OXXAMA1_XEO_Poland_Android_4.0.4.zip - 507.2 MB
  S7562XXAMD1_PRTAMD1_Poland_Play_Android_4.0.4.zip - 527.2 MB
  S7562XXBMD2_OXXBMD2_TPH_Portugal_Android_4.0.4.zip - 509.6 MB
  S7562XXBMD6_OJVBMD3_EGY_Egypt_Android_4.0.4.zip - 526.5 MB
  S7562XXBMD6_OJVBMD3_JED_Saudi_Arabia_Android_4.0.4.zip - 526.5 MB
  S7562XXBMD6_OJVBMD3_KSA_Saudi_Arabia_Android_4.0.4.zip - 526.5 MB
  S7562XXBMD6_OJVBMD3_XSG_United_Arab_Emirates_Android_4.0.4.zip - 526.5 MB
  S7562XXBMD6_OXEBMC1_SER_Russia_Android_4.0.4.zip - 567.7 MB
  S7562XXBMD6_QXXBME1_ROM_Romania_La_Fleur_Android_4.0.4.zip - 516.2 MB
  S7562XXBMI1_NZCBMG2_New_Zealand_Android_4.0.4.zip - 540.0 MB
  S7562XXBMJ1_DBTBMJ1_Germany_Android_4.0.4.zip - 578.6 MB
  S7562XXBMJ1_ODDBMJ1_India_Android_4.0.4.zip - 545.2 MB
  S7562XXBMJ1_OJVBMJ2_JED_Saudi_Arabia_Android_4.0.4.zip - 554.8 MB
  S7562XXBMJ1_OJVBMJ2_KSA_Saudi_Arabia_Android_4.0.4.zip - 554.8 MB
  S7562XXBMJ1_OJVBMJ2_TUR_Turkey_Android_4.0.4.zip - 554.8 MB
  S7562XXBMJ1_OLBBMJ1_Southeast_Asia_Android_4.0.4.zip - 548.8 MB
  S7562XXBMJ2_XSABMJ1_Australia_Android_4.0.4.zip - 552.0 MB
  S7562XXBML1_OXXBML1_EUR_Greece_4.0.4.zip - 566.4 MB
  S7562XXBND2_OJVBND1_TUR_Turkey_4.0.4.zip - 583.0 MB
  S7562ZCAMH1_CHNAMH1_China_Android_4.0.4.zip - 512.3 MB
  S7562ZSAMH2_OZSAMH2_BRI_Taiwan_Android_4.0.4.zip - 595.3 MB
  S7562ZSAMH2_OZSAMH2_TGY_Hong_Kong_Android_4.0.4.zip - 595.3 MB


  S7562LVJALK2_UUBALK3_UPO_Uruguay_Android_4.0.4.zip - 504.2 MB
  S7562LVJAMB2_COLAMB1_Colombia_Android_4.0.4.zip - 513.7 MB
  S7562LVJAMH1_ZTOAMH1_Brazil_Android_4.0.4.zip - 523.2 MB
  S7562LVJAMK2_ZTOAMK2_Brazil_4.0.4.zip - 527.2 MB
  S7562LVJAND1_COLAND1_Colombia_4.0.4.zip - 546.8 MB

Download From:
Mirror 1
Mirror 2
---------------------------------------------------
Samsung S7562L Firmwares:
Android 4.0.4:
- S7562LVJALK2 / UUBALK3 TPA Panama
- S7562LVJALK2 / UUBALK3 UPO Uruguay 
- S7562LVJAMB2 / COLAMB1 Colombia
- S7562LV JAMB2 / UUBAMB1 TPA Panama
- S7562LVJAMD5 / UUBAMD5 COO Colombia
- S7562LVJAMH1 / ZTOAMH1 Brazil 
- S7562LVJAMK2 / ZTOAMK2 Brazil
- S7562LVJAND1 / COLAND1 Colombia
- S7562LVJANE1 / ZTOANE1 Brazil

Download From:
Mirror 1
Mirror 2

Samsung Galaxy S7 Edge Tool Utility for the Samsung Galaxy S7 Edg

Team Win Recovery Project 3.0.2-0


This is for the International SM-G935F/FD/X, Korean SM-G935S, and Canadian SM-G935W8 Exynos Edge models only! Do not flash on regular S7 or Qualcomm models!

WARNING #1: Flashing a custom recovery to your device will trip the Knox warranty bit on your phone. Check with your mobile provider to see if they will still cover warranty on Knox bit triggered devices. If you understand this risk, continue on.
You generally dont have to worry, as its incredibly hard to brick a Samsung device, and physical damage warranties should be exempt from Knox triggering.

WARNING #2: The Galaxy S7 stock boot image h as dm-verity, which prevents you from booting if you swipe to enable system modifications!
SOLUTION: Follow the full rooting steps below, in order, to allow system modifications without the risk of a boot loop!


WHAT IS TWRP?

Oh come on, you know what it is - dont try to fool me!
In case youre serious, though...

Team Win Recovery Project is a custom recovery for Android devices.
It allows you to back up and restore your data, flash custom ROMs to your device, repair broken file systems, and root your device.

DOWNLOAD

You can find the device page here:
teamwin

There is a download link there, as well as instructions on how to flash it.

I highly recommend using Odin to flash when possible.
You can find a zip containing Odin as well as a link to Samsungs Mobile drivers page here:
Click Here

FULL STEPS FOR OBTAINING ROOT
  1. In your ROM, go to Settings -> About device. Tap 7 times on Build number to enable Developer options.
  2. Now go to Settings -> Developer options. (above About device)
    You need to enable OEM unlock, otherwise you might end up with boot problems or be unable to flash later on.
  3. Extract Odin_3.10.7.zip to your computer.
  4. Install Samsung Mobile Phone Drivers for Odin to find your device.
  5. Download a .tar image of TWRP for hero2lte.
  6. Reboot your device into Download mode. To do this, select reboot from the power menu and hold the [Volume Down] + [Home] buttons while your device reboots.
    Once you reach the Download mode warning screen, press [Volume Up] to continue.
  7. Open Odin and place that TWRP tar file in the [AP] slot without touching any other options, then press [Start].
  8. Hold [Volume Up] + [Home] buttons near the end of the flash, and keep holding them until you are in recovery.
  9. At this point, you will reach the screen asking you if you want to allow system modifications.
    By swiping right, you will trigger dm-verity, and if you do nt follow step 12 you will be unable to boot!
    If you are going to root your device and follow the rest of these steps, then it is safe to swipe right and enable modifications.
  10. Go to [Wipe] -> [Format Data] (not advanced wipe) -> type "yes".
    WARNING: This will wipe your internal storage, disable encryption, and factory reset your phone!
  11. Go to [Reboot] -> [Recovery].
  12. If you want to be rooted with SuperSU:
    Download the latest SuperSU by Chainfire.
    Without exiting TWRP, transfer the SuperSU zip to your device over MTP* and flash it using [Install] in TWRP.

    If you only want a bootable system partition or writable data in TWRP:
    Download dm-verity and force encryption disabler.
    Without exiting TWRP, transfer no-verity-opt-encrypt.zip to your device over MTP* and flash it using [Install] in TWRP.
  13. Go to [Reboot] -> [System].
  14. Wait 5-15 minutes for your device to finish setting itself up.
* MTP, known as Media Transfer Protocol, is the same way you transfer files from your PC to your device when booted into system.


CHANGES
  • v3.0.2-0 - See here for the changes.
  • v3.0.1-0 - Fixed USB OTG storage
  • v3.0.0-0 (twrp.me) - Disabled backup/restore of modem partition (must be signed and flashed in Odin)
  • v3.0.0-0 - Initialize new device tree based on Samsung OSRC G935FXXU1APAW kernel.

FEATURES
  • MTP support
  • USB Mass Storage support
  • Micro SDcard and USB OTG storage support
  • f2fs file system support (read, write, format, backup & restore)
  • exFAT file system support (read, write, format, backup & restore)
  • NTFS file system support (read, write, format)
  • ADB root
  • Full SELinux support
  • Built in android 6.0 tree

KNOWN ISSUES
  • Samsung encryption is not supported yet in TWRP 3.0.0 (see: http://ouo.io/0Pd67)

CONTACT & SUPPORT

You can find us on IRC at #twrp on chat.freenode.net.
You can also post in this thread and I will attempt to answer any questions you may have.

SOURCE CODE

TWRP: http://ouo.io/Jo7675 (android-6.0)
Device tree: https://github.com/TeamWin/android _msung_hero2lte (master)
Kernel: http://ouo.io/71Mq2 (twrp-6.0)

CONTRIBUTIONS

Gerrit for TWRP: http://ouo.io/d3GId2
Gerrit for officially supported devices: http://ouo.io/l9FPS0

XDA:DevDB Information
Team Win Recovery Project - Samsung Galaxy S7 Edge, Tool/Utility for the Samsung Galaxy S7 Edge

Contributors
jcadduono, Team Win & friends 
Source Code: https://github.com/jcadduono/android...amsung_herolte


Version Information
Status: Stable
Current Stable Version: 3.0.2-0
Stable Release Date: 2016-04-05

How to change the wallpaper on a Samsung Galaxy S2

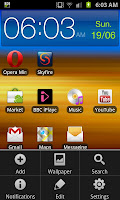
So youve had your Samsung Galaxy S2 for a little while now and youve finally decided you want to change the way the phone looks, you want to choose a different wallpaper (or if you rather "change the home screen"). The only problem is youre not sure on how you change the wallpaper of your Samsung Galaxy S2, well read on this little guide will take you by the hand and help you change it.

The first step is to press the menu button on the phone to bring up the small menu on the bottom of the screen (as you can see on the picture to the right) from here, you rather predictably press on "Wallpaper".

After pressing wall paper you get given 3 options. "Gallery", "Wallpaper gallery" and "Live Wallpapers". The "Gallery" option allows you to use the pictures that are on your phone, be they downloaded images, screen captures or camera photographs, the Wallpaper gallery has a number of pre-loaded designs whilst the Live wallpapers also has a number of inbuilt designs, its one of those that we will be using.

When you click on which ever type of wallpaper you wish to use you will be given a host of different ones. For the Live wallpapers Ive been given the options to the right and gone for the very bottom one "Windy weather" which uses the current weather for where I am as the basis for the wallpaper. The weather information is taken from "Accuweather.com" the same company that do the apps and as you can see in the image below its raining where I am.
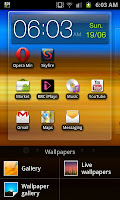
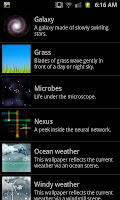
In the background of this wallpaper the "live" parts are the up to date weather readings, the windmills spinning in the backgrounds and the effects the various weather effects have. Though of course you can pick any wallpaper that is on the phone. Just remember one of the tips from the recent blog about getting the most from your battery- a live wallpaper will use up your battery quicker than a still wallpaper.


 Tinkering with the the wallpaper/homescreen is one of many ways to personalise your Samsung Galaxy S2 just the way you want it. As well as sticking the face of a loved one in the background you can of course select a ringtone that suits you which is another way of making a phone feel like its your phone.

Samsung Gear S2 update brings Flight Mode and Auto Brightness support

#Samsung is now sending out an update for the #GearS2 wearable which brings support for Flight Modeand Auto-Brightness on the smartwatch. These are crucial additions which could help you eke out more juice from the device on a single charge. The update seems to be arriving on the wearable over-the-air, so expect it to reach your Gear S2 very soon if you haven’t seen it already.
The software version is bumped to R732XXU2CPB7 post the update. It’s not a major update by any means as it is said to be just 82.51MB in size, so you probably won’t need to keep your paired device on WiFi to install the update.
For the time being, we think the Gear S2 is one of the best smartwatches selling in the market thanks to its unique rotating bezel display and wide set of applications that are designed specifically for the device. If you’re looking to get it on the cheap, Amazon is currently selling it with a $50 off, so make sure you give it a look.
Have you seen the update on the Gear S2 yet? Sound off below.

Via: SamMobile

Having problems with your phone that won’t turn on?
We can help you troubleshoot. We already published troubleshooting guides for the following devices:
  • Samsung Galaxy S2
  • Samsung Galaxy S3
  • Samsung Galaxy S4
  • Samsung Galaxy S5, Android Lollipop edition
  • Samsung Galaxy S6
  • Samsung Galaxy S6 Edge
  • Samsung Galaxy S6 Edge+
  • Samsung Galaxy S7
  • Samsung Galaxy S7 Edge
  • Samsung Galaxy Note 2
  • Samsung Galaxy Note 3
  • Samsung Galaxy Note 4 Android Lollipop edition
  • Samsung Galaxy Note 5 

Friday, May 26, 2017

How to change the font on your Samsung Galaxy S2

 Along with everything else you can do to personalise your Samsung Galaxy S2 (SGS2) smartphone you can also change the font. Although the selection is relatively limited to begin with there is an ability to buy more form the Market (though these do feel over-priced and arent worth their money on the whole).

To change the font just follow this guide which starts on the right with the "Setting" screen. From here you need to click on "Display" which is by default the 4th option down.  The display settings menu, for illustrative purposes can be seen on the screen capture to the left of this paragraph. From this list of settings you need to slick on the top one, the "Screen display option"


The "Screen display option should look something like the screen on the right here, The top option, as you can see, says "Font style" if you click on this you open up a new menu which 
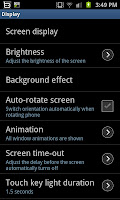
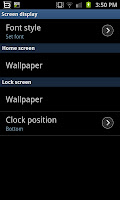
contains the fonts available to you. In my case Ive got the option of the Default font, Choco cooky and Helvetica S (as you can see to the left).


When you change the font setting youll notice that everything looks very different. The below example shows a text conversation with the Choco cooky font being used on the phone. As you can see the font looks a lot more fun and le ss serious than some of the others and can be a good way to personalise your phone.

How do I change network but keep my number

With all the options on the phone market today the best deals move from network to network and a clever customer will make sure they get the best deal going when they come to upgrading (or even end) their contract. People will also want to keep their number, after all why should you have to change number to get a better deal? Well if you follow this guide you will be able to keep your number AND get the best deal available with out even breaking sweat.

Stage 1
The first step to changing networks whilst keeping your current number is to call your current network provider. You will need to call their customer service department so rather than listing all their numbers here Id advise looking on the providers network. During your call you will need to request your PAC number.

The PAC number is the short term for "Porting Authorisation Code", which is a 9 digit code (3 letters followed by 6 numbers) that you will need to "port" your number to your new network. You are legally entitled to this number free of charge and you should receive it either by text or over the phone almost instantly. Though note at this point that you will need to do the next stage within 30 days of receiving your PAC.

Stage 2
Now you will need to contact the network you are wishing to move to. You will need to arrange your contract or deal with them at this stage so make sure you are getting a better deal than the one you were on and also mention you are wanting to "port" or "keep" your current number. When you mention you are wanting to retain your number they should ask if you have your PAC number, you will be asked to provide them with it.

If youve gone into the store and sorted your new deal out they may give you a temporary number whilst they port your number (should only take 1 or 2 days) if however youve done your deal over the internet or the phone you may need to call the customer services of the new ne twork.

Example
Lets say you were with Orange and you wished to leave them at the end of your contract to go to 3 contract. At the end of your contract with Orange you would call their customer services (either 150 or 450 depending on if you are on a contract or PAYG) and request your PAC. Next you would sort out your new deal with 3 and wait for the handset to arrive. When you receive your 3 handset you would call 3 (dial 333 from the phone) and give them the PAC for them to port your phone over and youll be sorted out within 3 days (typically 24 hours).

How to set up a tethered connection with a Samsung Galaxy S2

 Recently I did a guide on setting up a portable Wi-Fi Hotspot using the Samsung Galaxy S2. As well as using wireless technology to share the phones internet you can also use a wired connection via USB cable in a process that is known as "tethering". To start the "tethering" process you need to connect the phone to a laptop (or computer) via USB cable and make sure that the phone is still in "phone mode" (you may need to press "Home" to ensure youre not stuck in data mode).

After linking your phone and laptop you need to open the settings screen so press "Menu" on the hand set and then settings to open a screen similar to the one on the right hand side and then select the top option of "Wireless and network" which will
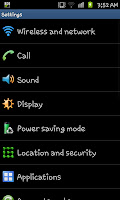
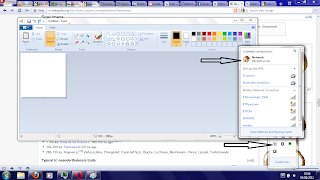
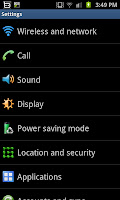
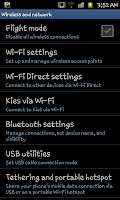
open up the wireless settings for the phone. In here you will need to scroll to the option entitled "Tethering and portable hotspot" (see the image on the left for guidance if you need it) and click on it.

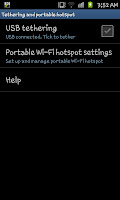
With the USB cable connected you will notice that the USB tethering option is available to be selected (if the cable isnt connected this option will be grayed out completely). At this screen (one on the right) you need to put a tick in the "USB tethering" check box. After doing this you effectively done with
 the phones settings however you will notice a a new icon on the
 notification bar (a small blue square with a USB icon inside it)
and a small message saying "Tethering or hotspot active" (see left).

Although youre done with your phone at this point you will notice that your laptop, or computer will start to become much more active as it installs a number of drivers to allow you to actually use this function. These can take several minutes to fully install then you should notice a new icon in the taskbar as well as a connection to a "Network"

 If you click on the image to the right you will notice that the connection to the internet is via "Network", this is the tethering working (see the top arrow) whilst in icon tray you will notice a "network" type symbol.


As with setting up a Wi-Fi hotspot tethering does have its draw backs. Firstly you are limited to the speed of the phones internet (unless you are using it to effectively join a Wi-Fi connection, where the phone acts as Wi-Fi card, where you are still limited to the Wi-Fi speed) and secondly you will use your data connection if you are using a form of mobile internet for the connection. Tethering, if done often could see you amassing a large phone bill if youre not careful due to the data usage so just be careful.

As with using the phone as a Wi-Fi hotspot, I wouldnt advise doing it too often unless youre on a truly unlimited internet package or can really keep an eye on your usage.